Frequent users should notice that some of the
Dynamics AX forms have an option to switch to a tree layout. In some
cases, especially when there are parent-child relations among records,
it is a much clearer way to show the whole hierarchy as compared to a
flat list. For example, projects and their subprojects displayed in the Project Details form give a much better overview when switched to a tree layout.
This recipe will discuss the principles of how to build tree-based forms. As an example, we will use the Budget model form, which can be opened from General ledger | Setup | Budget | Budget model.
This form contains a list of budget models and their submodels.
Although the data is organized using a parent-child structure, currently
this form does not have a hierarchy layout. The goal of this recipe is
to correct that problem.
How to do it...
1. In AOT, create a new class called BudgetModelTree with the following code:
class BudgetModelTree

{
FormTreeControl tree;
BudgetModelId model;
}
void new(
FormTreeControl _formTreeControl,
BudgetModelId _budgetModelId)

{;
tree = _formTreeControl;
model = _budgetModelId;
}
public static BudgetModelTree construct(
FormTreeControl _formTreeControl,
BudgetModelId _budgetModelId = '')

{
return new BudgetModelTree(
_formTreeControl,
_budgetModelId);
}
TreeItemIdx createNode(
TreeItemIdx _parentIdx,
BudgetModelId _modelId,
RecId _recId)

{
TreeItemIdx itemIdx;
BudgetModel modelSub;
;
itemIdx = SysFormTreeControl::addTreeItem(
tree,
tree controltree controlusing_modelId,
_parentIdx,
_recId,
0,
true);
if (model == _modelId)
{
tree.select(itemIdx);
}
while select modelSub
where modelSub.ModelId == _modelId &&
modelSub.Type == HeadingSub::SubModel
{
this.createNode(
itemIdx,
modelSub.SubModelId,
modelSub.RecId);
}
return itemIdx;
}
void buildTree()

{
BudgetModel modelMain;
BudgetModel modelSub;
TreeItemIdx itemIdx;
;
tree.deleteAll();
tree.lock();
tree controltree controlusingwhile select modelMain
where modelMain.Type == HeadingSub::Heading
notexists join modelSub
where modelSub.SubModelId == modelMain.ModelId &&
modelSub.Type == HeadingSub::SubModel
{
itemIdx = this.createNode(
FormTreeAdd::Root,
modelMain.ModelId,
modelMain.RecId);
SysFormTreeControl::expandTree(tree, itemIdx);
}
tree.unLock(true);
}
2. Open the BudgetModel form in AOT, and create a new tab page:
|
Property
|
Value
|
|---|
|
Name
|
TabTree
|
|
Caption
|
Tree
|
3. Add a new Tree control to the new tab page:
|
Property
|
Value
|
|---|
|
Name
|
ModelTree
|
|
Height
|
Column height
|
|
Width
|
Column width
|
4. Add the following code to the bottom of the form's class declaration:
BudgetModelTree budgetModelTree;
5. Override the form's init() with the following code:
public void init()

{;
super();
budgetModelTree = BudgetModelTree::construct(ModelTree);
}
6. Override pageActivated() on the TabTree tab page with the following code:
public void pageActivated()

{;
super();
budgetModelTree.buildTree();
}
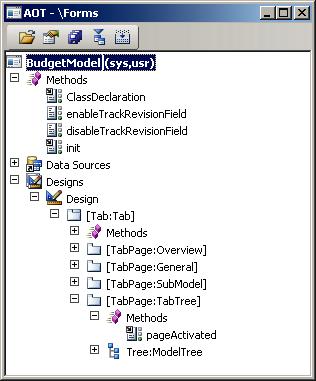
7. In AOT the BudgetModel form should look like the following screenshot:
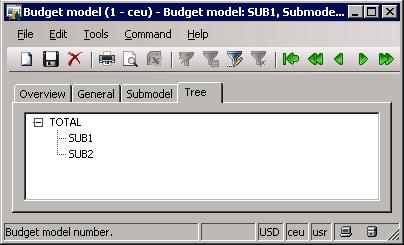
8. To test the tree control, open General ledger | Setup | Budget | Budget model, and select the Tree tab page. Notice how the ledger budget models are presented as a hierarchy:
How it works...
In order to separate
the tree from the rest of the layout, we create a new tab page. Then, we
add the actual tree control to the tab, which we use as a basis. Tree
nodes are always generated from code. We also place all the
tree-building logic into a separate class to make sure that it can be
reused elsewhere, and the form itself does not get messy.
Besides the common new() and construct() methods, the class contains two methods, which actually generate the tree. The first method is createNode()
and is used for creating a single budget model node or a whole branch.
It is a recursive method, and it calls itself to generate the children
of the current node. It accepts a parent node and a budget model as
arguments. In this method, we create the node by calling the addTreeItem() method of the SysFormTreeControl class. The rest of the code loops through all submodels and creates subnodes (if there are any) for each of them.
Secondly, we create buildTree() where the whole tree is built. Before we actually start building it, we delete all nodes and lock the Tree control. Then, we add nodes by looping through all parent budget models and calling the previously mentioned createNode(). We call the expandTree() of the SysFormTreeControl class to show every parent budget model expanded. Once the hierarchy is ready, we unlock the Tree control.
Hierarchy generation might
be time consuming, so we call it only when necessary, that is, when the
tab page is actually opened. We override the tab page's and add a call to buildTree()
there. Initially, to increase performance for bigger trees, only the
first level of nodes has to be generated, and other nodes should be
created only when the user clicks on the particular node. This could be
achieved by placing the relevant code into the expanding() of the tree control in the form. Such an approach ensures that no time is spent on generating unused tree nodes. pageActivated()
There's more...
Besides hierarchical
layout, tree controls also allow users to use drag-and-drop
functionality. This makes daily operations much quicker and more
effective. Let's modify the previous example to support drag-and-drop.
We are going to allow users to move ledger budget submodels to different
parents within the tree. In order to do that, we need to make some
changes to the BudgetModelTree class and the BudgetModel form.
Add the following code to the BudgetModelTree class declaration:
TreeItemIdx dragItemIdx;
TreeItemIdx lastItemIdx;
Create the following additional methods in this class:
boolean canMove()

{
BudgetModel budgetModel;
RecId recId;
;
recId = tree.getItem(dragItemIdx).data();
select firstonly budgetModel
where budgetModel.RecId == recId;
return (budgetModel.Type == HeadingSub::SubModel);
}
void move(RecId _from, RecId _to)

{
BudgetModel modelFrom;
BudgetModel modelTo;
;
select firstonly modelTo
where modelTo.RecId == _to;
ttsbegin;
select firstonly forupdate modelFrom
where modelFrom.RecId == _from;
modelFrom.ModelId = modelTo.SubModelId;
if (modelFrom.validateWrite())
{
modelFrom.update();
tree controltree controldrag-and-drop, using}
ttscommit;
}
void stateDropHilite(TreeItemIdx _idx)

{
FormTreeItem item;
;
if (lastItemIdx)
{
item = tree.getItem(lastItemIdx);
item.stateDropHilited(false);
tree.setItem(item);
lastItemIdx = 0;
}
if (_idx)
{
item = tree.getItem(_idx);
item.stateDropHilited(true);
tree.setItem(item);
lastItemIdx = _idx;
}
}
int beginDrag(int _x, int _y)

{;
[dragItemIdx] = tree.hitTest(_x, _y);
return 1;
}
FormDrag dragOver(
FormControl _dragSource,
FormDrag _dragMode,
int _x,
int _y)

tree controltree controldrag-and-drop, using{
TreeItemIdx currItemIdx;
;
if (!this.canMove())
{
return FormDrag::None;
}
[currItemIdx] = tree.hitTest(_x, _y);
this.stateDropHilite(currItemIdx);
return FormDrag::Move;
}
void drop(
FormControl _dragSource,
FormDrag _dragMode,
int _x,
int _y)

{
TreeItemIdx currItemIdx;
;
if (!this.canMove())
{
return;
}
this.stateDropHilite(0);
[currItemIdx] = tree.hitTest(_x,_y);
if (!currItemIdx)
{
return;
}
this.move(
tree.getItem(dragItemIdx).data(),
tree.getItem(currItemIdx).data());
tree.moveItem(dragItemIdx, currItemIdx);
}
Locate the BudgetModel form in AOT, find its ModelTree control, and change the following property:
|
Property
|
Value
|
|---|
|
DragDrop
|
Manual
|
Also, override the following methods of the ModelTree control:
public int beginDrag(int _x, int _y)
{
return budgetModelTree.beginDrag(_x, _y);
}
FormDrag dragOver(
FormControl _dragSource,
FormDrag _dragMode,
int _x,
int _y)

{
return budgetModelTree.dragOver(
_dragSource,
_dragMode,
_x,
_y);
}
void drop(
FormControl _dragSource,
FormDrag _dragMode,
int _x,
int _y)

{;
budgetModelTree.drop(_dragSource, _dragMode, _x, _y);
}
Now when you open General ledger | Setup | Budget | Budget model, you should be able to move budget models within the tree with a mouse.
The main element in the latter modification is the DragDrop property of the tree control. It enables the drag-and-drop function, once we set its value to Manual.
The next step is to override drag-and-drop events on the tree control.
Tree controls could have a number of methods covering various
drag-and-drop events. A good place to start investigating them is the Tutorial_Form_TreeControl class in the standard Dynamics AX application. In this example, we will cover only three of them:
beginDrag() is executed when dragging begins. Here, we normally store the number of the item that is being dragged for later processing.
dragOver() is executed once
the dragged item is over another node. This method is responsible for
highlighting nodes when the dragged item is over them. Its return value
defines the mouse cursor icon once the item is being dragged.
drop() is executed when the
mouse button is released, i.e. dragged item is dropped over some node.
Here, we normally place the code that does actual data modifications.
In this example, all logic is stored in the BudgetModelTree
class. Each of the mentioned form methods calls the relevant method in
the class. This is to reduce the amount of code placed on the form and
allow the code to be reused on multiple forms. We added the following
methods to the class:
canMove() checks whether the
currently selected node can be dragged. Although there might be more
conditions, for this demonstration, we only disallow dragging of top
nodes.
move() is where the actual movement of the budget model is performed, i.e. submodel is assigned with another parent.
stateDropHilite() is responsible for highlighting and removing highlight from relevant items. Using stateDropHilited(),
we highlight the current item and we remove highlight from the
previously highlighted one. This ensures that as we move the dragged
item over the tree, items are highlighted once the dragged item is over
them and the highlight is removed once dragged item leaves them. This
method is called later from several places to make sure node
highlighting works correctly.
beginDrag() saves the item currently being dragged into a variable.
dragOver() first checks if the currently selected item can be moved. If not, then it returns FormDrag::None,
which changes the mouse cursor to the forbidden sign. Otherwise, the
cursor is changed to an icon representing node movement. This method
also calls stateDropHilite() to ensure correct node highlighting.
drop() also checks if the item being dropped can be moved. If yes, then it uses move() to update the data and moveItem() to visually change the node's place in the tree. It also calls stateDropHilite() to update tree node highlighting.